Be careful with your disk when reading this note and similar ones. Think twice before you take action.
Introduction to LVM
LVM (Logical Volume Manager) is a powerful tool for logical volume management on Linux systems. Since version 12.10, Ubuntu has introduced LVM support in the installation process.
The most attractive feature of LVM to me, is the capability to resize the disk volume dynamically. Traditionally, if we add a new hard drive to an exsiting Linux computer, we would assign a new mount point to the disk, and use some techniques to mount automatically at startup for convenience. With LVM, however, we can combine different physical volumes together and always add new space to an exsiting LVM partition in principle. For people who want to overcome volume shortage in their workstations/servers, it is a economic and brilliant choice.
Some basic concepts
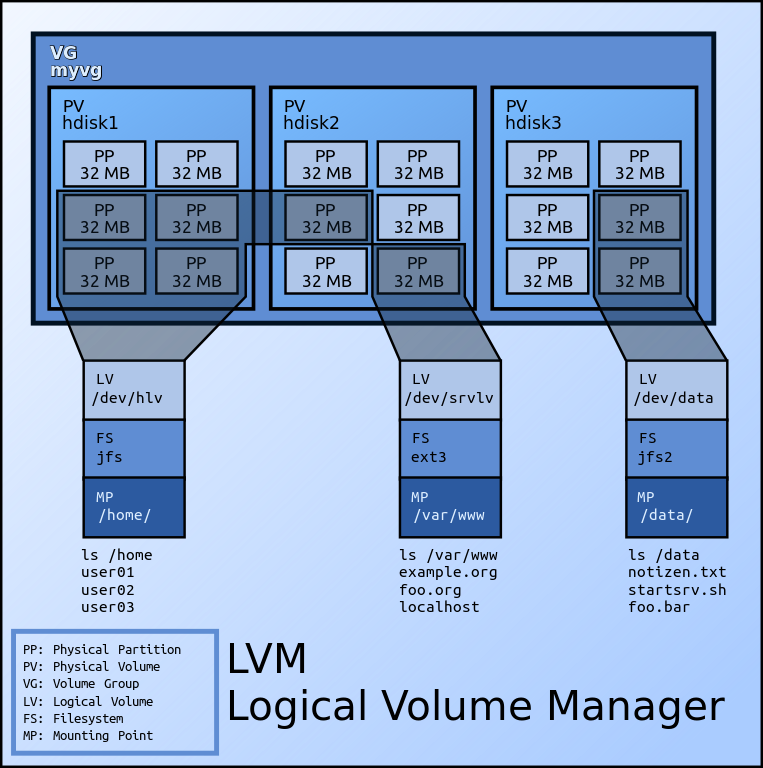
- PV (physical volume): actual disk or partions on it. The real one.
- VG (volume group): (virtual) group based on at least one PV. A LVM system may have multiple VGs.
- LV (logical volume): (virtual) volume created on VG.
Example with steps
I created 2 LVs when installing Ubuntu Server 16.04 LTS on a computer: /home which is users’ home directory and /store for data storage. A physical space of 4 TB was not in use at first. And when the /store dir is about to be full, I added the 4-TB free space to it.
Use df -h to check current status of file systems, and we’ll get output like:
Filesystem               Size  Used Avail Use% Mounted on
......
/dev/sdd6                459G  2.8G  433G   1% /opt
/dev/mapper/home-home     11T  7.6T  2.8T  73% /home
......
/dev/mapper/store-store   30T   27T  2.9T  90% /store
......
And the two LVM dirs /home and /store show differently (/dev/mapper/home-home and /dev/mapper/store-store) from physical volume like /opt in the first ‘Filesystem’ column. The first ‘home’ in ‘home-home’ stands for the Volume Group (VG) and the second for the Logical Volume (LV) of the VG. The names can be choosen arbitrarily, and I used these names during installation just for simplicity.
Do sudo fdisk -l to list all disks. I found the 4-TB free space is under /dev/sda, whose number is 3.
First use parted tool to first turn on LVM on this partition, then create physical volume (PV) /dev/sda3, and finally extend store with /dev/sda3.
Turn on LVM on the free space
Excute parted on the disk where new physical space is located. I use /dev/sda because the 4-TB space in on it. If you want to add a new disk, say /dev/sdd, just use it in the following commands.
sudo parted /dev/sda
And we’ll get
GNU Parted 3.2
Using /dev/sda
Welcome to GNU Parted! Type 'help' to view a list of commands.
The free space starts from 38.0TB and ends at 42.0TB on the disk. So we make a logical volume using
(parted) mkpart logical 38.0TB 42.0TB
Let’s print the information, we can see Number 3 is ’logical’ now.
(parted) print
Model: LSI MR9260-8i (scsi)
Disk /dev/sda: 42.0TB
Sector size (logical/physical): 512B/4096B
Partition Table: gpt
Disk Flags:
Number  Start   End     Size    File system  Name     Flags
 1      1049kB  4000GB  4000GB                        lvm
 2      4000GB  38.0TB  34.0TB                        lvm
 3      38.0TB  42.0TB  4004GB               logical
Now turn it to LVM partition.
(parted) set 3 lvm on

(parted) print
Model: LSI MR9260-8i (scsi)
Disk /dev/sda: 42.0TB
Sector size (logical/physical): 512B/4096B
Partition Table: gpt
Disk Flags:
Number  Start   End     Size    File system  Name     Flags
 1      1049kB  4000GB  4000GB                        lvm
 2      4000GB  38.0TB  34.0TB                        lvm
 3      38.0TB  42.0TB  4004GB               logical  lvm
(parted) quit
Create Physical Volume and extend Volume Group
This step is pretty straightforward.
sudo pvcreate /dev/sda3
  Physical volume "/dev/sda3" successfully created

sudo vgextend store /dev/sda3
  Volume group "store" successfully extended
To make it take effect immediately, we do lvextend and resize2fs.
sudo lvextend -l +100%FREE /dev/store/store
  Size of logical volume store/store changed from 30.92 TiB (8106231 extents) to 34.56 TiB (9060916 extents).
  Logical volume store successfully resized.

sudo resize2fs /dev/store/store
resize2fs 1.42.13 (17-May-2015)
Filesystem at /dev/store/store is mounted on /store; on-line resizing required
old_desc_blocks = 3959, new_desc_blocks = 4425
The filesystem on /dev/store/store is now 9278377984 (4k) blocks long.
The /store directory has now been extended.